
In the previous article, we covered how we can install OpenJDK JRE/JRE in Ubuntu 24.04. Now, what if we have multiple versions of Java installed? The application that we intend to run or build is closely dependent on one specific version then we would have to use the specific version of Java.
In that case, there is no other option but to change the default Java version.
Note: The following operations require Administrative rights. If you lack the necessary rights to make changes to your system then, contact your System Administrator for assistance.
Change the default version of Java in Ubuntu 24.04
We can see the current default version of Java through the following command in the terminal:
java --version
Now, use the update-alternatives command-line tool to change the default version:
sudo update-alternatives --config java
It would list all the installed versions of Java in our system. For us, it returned with 3 choices.
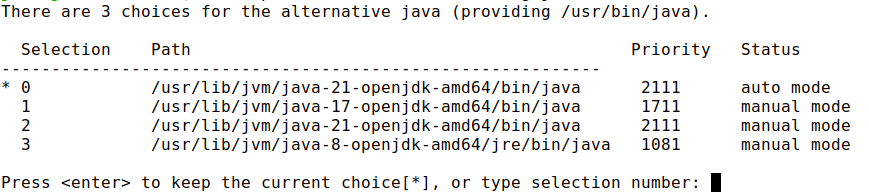
The default version is marked with an asterisk. It was version 21 for us. If we press the Enter key, the current default version stays as it is. Since we wanted v17 to be the current default. So, we pressed 1 and Enter.
To verify if the default version has been changed or not:
java --version
This time around we could see the following in the standard output:
openjdk 17.0.10 2024-01-16
In conclusion, we have covered how to change the default version of Java in Ubuntu 24.04.